
Improving Sound for Your PS4 Live Stream with Samson USB Microphones
Samson
Live streaming has exploded on the gaming scene and is only getting more popular by the day. From Twitch to YouTube, gamers are finding huge audiences and communities online to engage with. How do you make your stream/channel stand out from the crowd? Why, high-quality audio from a professional microphone, of course!
Amping up your audio when live streaming your gaming session is the best way to engage and interact with your audience. You’ll have more interested followers and people will be more apt to come back to watch your streams. Here’s how to utilize your Samson USB microphone with a PlayStation 4 to bring pro sound quality to your streams.
First, on the PlayStation home screen use your controller to navigate upwards to your toolbar. Go to the ‘Settings’ menu on the right side and press X.
From here, navigate down to the ‘Devices’ menu. Press X to open it, then choose ‘Audio Devices’. Now, plug in your Samson USB microphone. You’ll get a dialog asking you who is using the device. Select the user account on your PS4 that you want to stream with. After you choose the user, you’ll be back in your audio devices menu. Your input device should say ‘USB Headset’ with the name of your Samson microphone in parentheses.
If you want to adjust the level of your microphone, it’s important to remember that there might be two places to do so. You can adjust the level directly on some Samson USB microphones. On the G-Track Pro, for example, you can dial in the gain with the Mic knob on the front. Adjust the input level on the microphone so that the microphone isn’t clipping or distorting. The Samson G-Track Pro and Meteor microphones have an LED indicator that lights red when your input level is too loud.
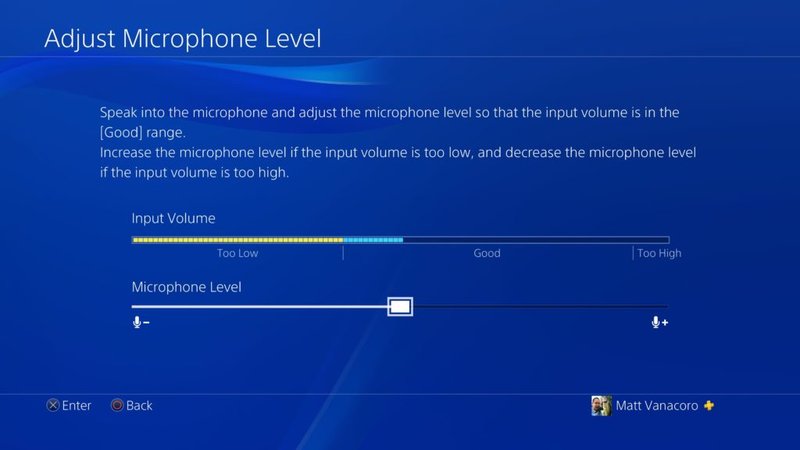
After adjusting the gain on the hardware, you’ll want to take a look at the gain in the software on the screen. Choose ‘Adjust Microphone Level’ in the Audio Devices menu and you can adjust the microphone level slider until your audio is in the ‘Good’ range on the screen. This will ensure that you have a decent audio level and that your listeners will hear you.
Press the circle button until you are in the root settings menu once again. Navigate down to ‘Sharing and Broadcasts’ and press X. In the Sharing and Broadcasts menu, you’ll want to go to the last menu item titled ‘Link with Other Services’. From here, choose your favorite streaming service and enter your account information. You will link your streaming service account with your PlayStation ID, and you’re nearly there!
Now, it’s time to get playing! Back yourself out to the main menu with the O button, and choose your favorite game. Once you’re in the game, press the physical ‘Share’ button on your DualShock 4 controller. On the left-hand side of the screen, you should see ‘Broadcast Gameplay’ if you’re using a game that supports live streaming (not all games do, remember that!).
You’ll be asked to choose which streaming service to use, you can title your broadcast, and configure a few settings like whether or not to include the video from your PlayStation camera. Most important here is to check off ‘Include Microphone Audio in Broadcasts’. That will allow your speech to come through nice and clear with your USB microphone. The audio quality will be dramatically improved from using a gaming headset or direct from the PlayStation Camera.
When you’re finished, press the ‘Share’ button again and end your broadcast. Keep it up to build your audience and you’ll be a pro streamer in no time!
Watch and listen to a PS4 live stream featuring Samson USB microphones: Meteor Mic, XPD2 Headset and G-Track Pro.