
A Closer Look at Dynamic Microphones, Part 2

Malcolm Doak
Tips for Using EQ on a Live Vocal Mic
There is yet another powerful tool for ensuring remarkable sound when using your hand-held dynamic microphone in a live setting: The EQ, or equalization, circuitry that exists in the audio console or the sound system the microphone will be connected to. Simply put, equalization can selectively boost or cut specific areas of the harmonic spectrum, with the goal of shaping the tone for optimal performance. Generally, the sound system will have two forms of EQ. The first type offers separate controls for each input channel; the second type – usually a graphic EQ – affects the overall tone before the sound is sent to the amplifiers and speakers. This second type is mainly used to adjust the tone of the entire system to match the acoustics of the venue, although if the individual channel EQ controls are lacking, the graphic EQ can pick up some of the slack. For optimizing the sound of an individual microphone, the focus here is on the first type of EQ.
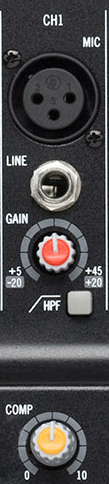
Understanding Gain
In order for the channel EQ controls to do their job properly, they need to be receiving enough signal. Each channel of the audio console or sound board will offer some sort of gain, or trim, control knob. This control makes certain that the signal from the microphone is being received with enough gain to satisfy the internal circuitry of the sound system. Too much gain will cause clipping and overloading, adding distortion – or worse. Too little gain will decrease the signal-to-noise ratio, causing the sound to lose clarity and inviting distortion. Each channel is often equipped with an LED (or two) to aid is setting up the proper input gain.
Examining the Audio Spectrum
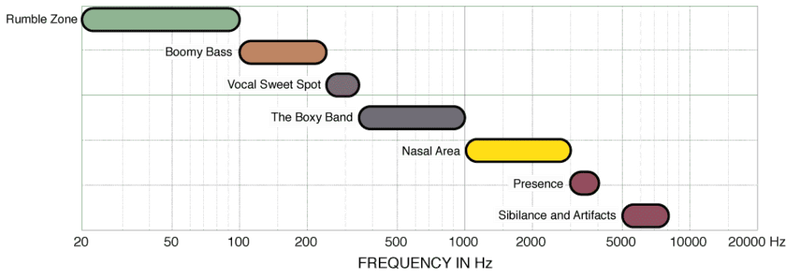
In an ideal world, there would be no need for EQ. Each microphone, all cables, every mixer, each amplifier, every speaker – and every ear – would process and reproduce sound free from tonal artifacts and coloration. But back here on earth, the reality is every component alters the tonality of the signal to some degree. So one of the jobs of the EQ is to minimize – or counteract – those effects. Another is to actively improve the tone. The EQ works by boosting or attenuating the strength of the signal in a particular region of the audio spectrum. The audio spectrum is simply the range of frequencies (roughly 20Hz–20kHz) that we can hear. Just as white light contains many colors that can be separated into bands by a prism, the EQ can separate this range of audio frequencies into specific bands. Learning how a certain band of frequencies can influence the overall sound can eliminate much of the guess work involved in achieving great sound – but let your ears be the final judge.
- Rumble Zone (20Hz–100Hz)
For vocals, there is not much happening here. However, this area of the spectrum can introduce a lot of rumble and mic handling noise. If you can minimize these frequencies, fine. Be aware that many hand-held vocal microphones, including the Samson Q8x, naturally attenuate these frequencies. - Boomy Bass (100Hz–250Hz)
Once again, there is really nothing here of benefit to creating a great vocal sound. These frequencies cause the bass components of the sound to be incredibly boomy. - Vocal Sweet Spot (250Hz–350Hz)
This band of frequencies can play an important role in your microphone sound. This area – more or less – represents the fundamental harmonic of most human vocals. Warmth and Mud are flip sides of the same coin here. Too much emphasis on these frequencies can make the sound muddy and less defined; attenuating these frequencies can cause the sound to lack a natural warmth. A parametric EQ, or one equipped with sweep-able mids, can quickly zero in on the “sweet-spot” for an individual voice and/or microphone. - The Boxy Band (400Hz–1kHz)
If these frequencies are allowed to be too prominent, they can overpower the sweet spot and remove fullness from the sound. They can also overpower the upper harmonics that provide presence. The result can be a very one-dimensional sound that lacks tone and depth. - Nasal Area (1kHz–3kHz)
“It don’t mean a thang if it ain’t got that twang!” This band of frequencies are home to the honk-like sound of nasal inflection. If you hear too much of that nasal twang, try cutting back on this frequency area. If you do not hear any pronounced nasal twang, just move along. - Presence (3kHz–4kHz)
Clarity, intelligibility, breathing space and a natural presence all come from this band of upper frequencies. These same attributes will help the vocal sound to cut through the mix. Be aware that this band may also be prominent with electric guitars and other onstage instruments. The Samson Q8x was engineered to provide a slight lift in this critical area. - Sibilance and Artifacts (5kHz–8kHz)
Lurking in this band of vocal frequencies lies the slithering sibilance created by the letter s and other artifacts of human speech. Be careful not to cut these frequencies back too far, as the range from 8kHz and above is also responsible for providing the vocal sound with “air” or “breathing space” so that it sounds alive in the mix.
When applying EQ, remember the old adage from architect Mies van der Rohe that “Less is More.” It is generally easiest to begin by slightly pulling back any problematic group of frequencies, and to then even more slightly add in anything still lacking.
About the Author